


Tips for Growing Butterflies in the Classroom
Ready to start your classroom's journey into the world of metamorphosis? Here's your guide to a fun and stress-free experience teaching your children about the incredible butterfly life cycle. You'll learn how to set up your caterpillars, observe their growth, move them into their Pavilion habitat and finally care and release them as adult butterflies! Read on to discover how to make the most of this unique STEM educational experience and maximize your classroom's learning journey!
(Note: This article is referring to the use of the Butterfly Pavilion School Kit with 33 caterpillars.)
Planning and Preparation
The most important thing when preparing for your butterfly project is to ensure local temperatures will be warm enough for the adult butterfly release 2-3 weeks after your caterpillars first arrive. Don't worry, it's easy! There's just a few things to remember:
1. Ensure indoor temperatures are around 70 degrees (room temperature).
If your caterpillars get too hot, moisture can form in the cup! If moisture is in the cup for too long, mold may form.
2. Confirm that outside temperatures are warm enough for a butterfly release.
Check your calendars! If temps are at least 55 degrees 2-3 weeks later, it is safe to release your butterflies!
Setup and Organization
The big day is here - your caterpillar friends have arrived! 32 Painted Lady caterpillars have arrived in one 8 oz cup with a small amount of caterpillar food inside. This food provides nourishment for the caterpillars during shipping. Also included are two cups of special Insect Lore caterpillar food (one 8 oz cup and one 2 oz cup).
It will be your job to transfer a small portion of this food (1 Insect Lore spoon equals 1/2 tablespoon) into the 32 small cups included in your kit. Then, you will gently transfer a baby caterpillar into each of the small cups. We have provided you with all of the food you need to fill each small cup.
Your caterpillars may seem inactive when you first receive them, but don’t worry! They need time to adjust to their new surroundings after shipping. Move your caterpillars to the small cups as soon as possible, but once they have been transferred, please give them 24 to 48 hours to acclimate. Soon they will be eating, growing and changing before your very eyes!
Your Butterfly Pavilion STEM School Kit includes:
- One 8 oz cup containing 32 Painted Lady caterpillars and enough
caterpillar food to maintain them during shipping - One 8 oz cup of Insect Lore caterpillar food
- One 2 oz small cup of caterpillar food
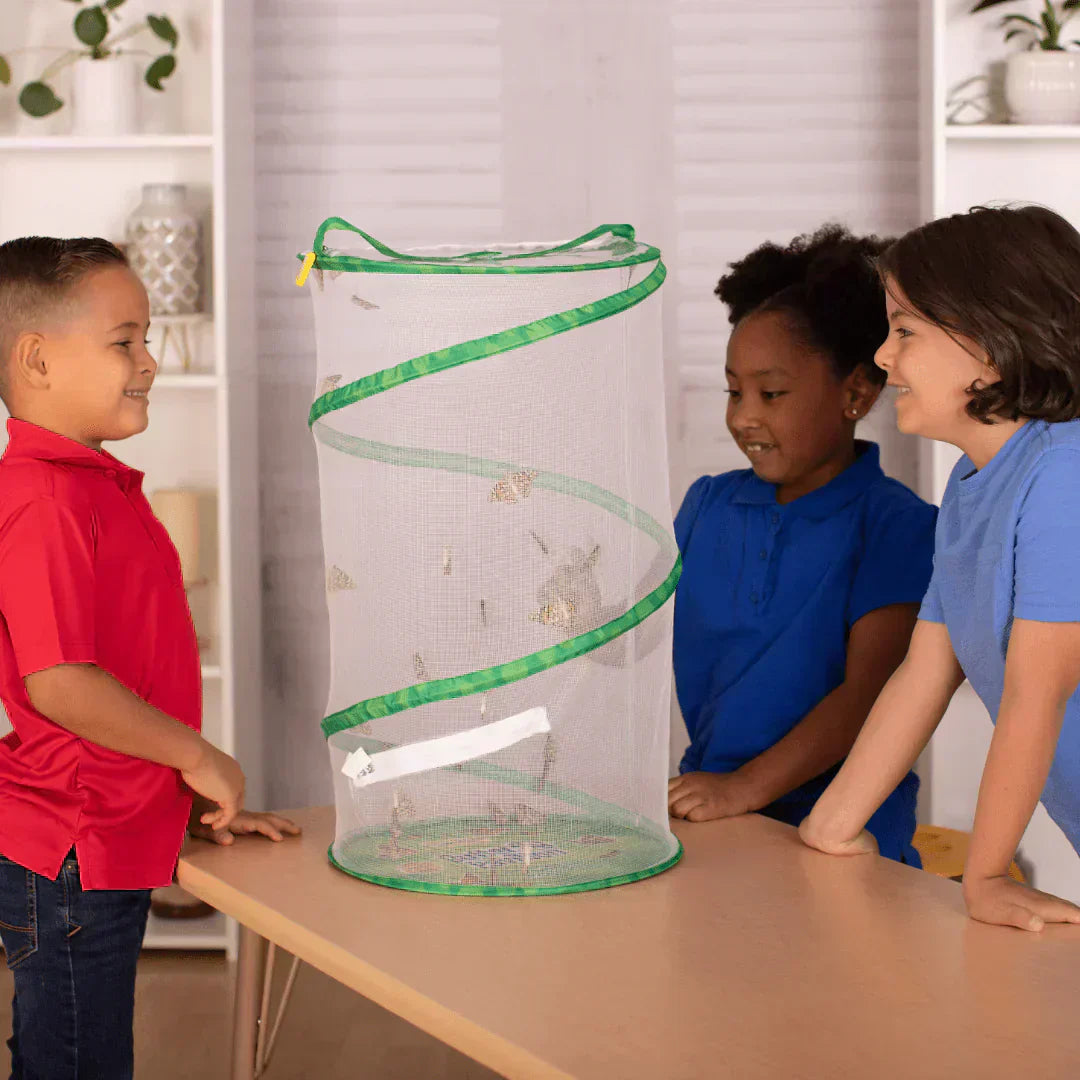
- 2 foot tall Butterfly Pavilion
- 32 small cups
- 32 small cup lids
- Insect Lore spoon and knife
- Caterpillar transfer brush
- 64 hook and loop fasteners
- Feeding Dropper
- 2 sugar packets
- Flower-shaped butterfly feeder
- Comprehensive Butterfly Pavilion School Kit Instructions
- READ ME with helpful caterpillar-raising tips
- STEM Butterfly Journal
Now that you're properly equipped, let's get these caterpillars in their cups!
1. Prepare the Small Cups and Caterpillar food.
Separate the small cups and lids. Remove the lid from your caterpillar food. Scoop exactly one spoonful (1/2 tablespoon) of caterpillar food with the special Insect Lore spoon. Level the food off with the knife to measure the correct amount of food. Drop this exact measurement of food into the bottom of each small cup. The knife is helpful to scoop out any food that may stick to the spoon.
Next, use the bottom of one of your extra small cups to gently press the caterpillar food down into the small cup. Do not squeeze the food too firmly —you don’t want to squeeze the moisture out of the food. Just make sure the food is wedged into the bottom of the cup. DO NOT overfill! 1/2 tablespoon is more than enough food for one caterpillar. Using this method, repeat for every individual caterpillar and their cup.
2. Transfer the baby caterpillars to the small cups.
Open the large cup of larvae. Using the brush, GENTLY pick up a caterpillar and transfer it into a small cup containing 1/2 tablespoon of food. Continue transferring the caterpillars to the small cups. Each time you transfer a caterpillar, snap a lid on the small cup. Keep your brush dry and don’t forget to save it - you will need it when it’s time to move your chrysalides to their habitat.
3. Watch Them Grow!
Your students will observe significant caterpillar changes every day! Place your small cups of caterpillars upright and in a safe place away from sunlight, windows or drafts. Do not shake or disturb the caterpillars. Keep the lids on the small cups at all times.
Avoid rapid changes in daytime and nighttime temperatures. If nighttime temperatures lower dramatically, place a towel over the small cups of caterpillars in the evening. Swings in temperature can cause condensation to form in the small cups. Condensation can result in an unhealthy environment for your caterpillars.
Daily Management and Observance
1. Life Cycle Timeline
Your tiny little caterpillars will be eating, crawling and growing for around 7-10 days before changing into chrysalides. If the room is warm or humidity is high, your caterpillars will grow more quickly.
2. Webbing in the Cup
It is a very good sign if you see your caterpillars spinning silky webbing in the cup! In a caterpillar’s natural habitat, this webbing protects the caterpillar from many dangers. A caterpillar will use the webbing to attach itself to a leaf so it will not be blown away by the wind.
3. Frass
As your caterpillars eat and grow, they will produce tiny balls of waste, or “frass”. You’ll see this frass at the bottom of your caterpillar cup. You can leave this inside the cup until they have formed their chrysalides and it is time to transfer the habitat (but we'll talk about that later!)
4. Chrysalis Form
Your caterpillars will climb to the tops of the small cups once they have eaten their fill, stored enough energy, and are ready to pupate (become chrysalides). There they will spin a silk pad, which will be the anchoring point for the chrysalis. The caterpillars will use this silk pad to attach themselves to the lids, and then will hang in a “j” shape. Do not disturb the caterpillars for 3 days in order to allow them to safely harden into chrysalides.
Chrysalis and Emergence
1. Chrysalis movement
Do not disturb the caterpillars for 3 days in order to allow them to safely harden into chrysalides. If you shake or disturb your chrysalides, you might see them “wiggle”! This is your chrysalides’ way of saying “Don’t touch!”, and in the wild is an effort to frighten away predators.
2. Move the Chrysalides to the Butterfly Habitat
After 3 days have passed, your chrysalides have hardened and are ready to be moved to the habitat, where they will transform into butterflies in 7 to 10 days. Follow these steps to stick each of the small cup lids with the chrysalides attached to the inside wall of the habitat. Get your transfer brush, butterfly habitat, and strips of hook and loop fasteners
ready.
- Gently remove the lid (with a chrysalis attached) from a small cup. Using the transfer brush, remove all silk strands and frass from the lid and surrounding the chrysalis. This is very important, as any remaining silk strands and frass may entangle your emerging butterfly.
- Peel the first dot off the strip of hook and loop fasteners.
- Stick the dot on the back of the lid (the side the chrysalis is not attached to).
- Peel a second dot off and stick it to your index finger
- Press the side of the lid with the dot attached to it against the inside mesh wall
of the habitat, so the teeth of the dot push through the mesh (from the inside to the outside). - Connect the teeth of the second dot on your index finger to the teeth of the first
dot (through the mesh) to securely attach the lid (and your chrysalis) to the inside wall of the habitat.
Repeat these steps with all 32 lids, and be sure to space each lid (with chrysalis attached) at least 2 inches apart.
3. What to Do if a Chrysalis Falls
If a chrysalis falls off a lid, gently remove any frass surrounding it and place it on a paper towel at the bottom of your habitat, near the mesh wall. The butterfly will emerge there successfully. Be sure to place the habitat away from direct sunlight and drafts.
4. Preparing for Emergence
The adult butterfly will emerge after 7-10 days in the chrysalis. Place a towel or paper towels underneath the habitat. Like any birth, the transformation from chrysalis to butterfly can be a little messy. You may notice a small amount of red meconium. Do not be disturbed by this natural occurrence. Meconium is not blood; it is the waste liquid left over after metamorphosis. That’s why it is a good idea to place a paper towel or cloth under the habitat to protect any permeable surfaces or furniture from staining.
5. See Your Butterflies Emerge!
For 7 to 10 days, the chrysalides may look like they are sleeping, but an amazing transformation is taking place inside! You will know your butterflies will soon emerge when the chrysalides darken noticeably and you can see the outline of the wings beneath. When a butterfly is ready to emerge, it takes in air through spiracles (tiny holes) in the chrysalis. This added air pressure helps the butterfly split the chrysalis open at specific seams or “lines of weakness.”
The butterfly will climb out of the split chrysalis with soft, crumpled wings and then position itself head upward in a vertical position. It will sway from side to side, forcing blood into the veins of its wings in order to expand them to their full size. Do not touch or disturb the butterfly during this process. You may see the butterfly expel a small amount of red meconium during this wing expansion.
When a butterfly is born, its tongue (or proboscis) begins as two long strands or halves that must be fused together. The two halves eventually join to form a tube-like tongue. The butterfly will use this tube to sip or soak up nectar.
6. Feeding and caring for your butterflies
Empty 2 sugar packets into 1/3 cup water and mix well. Drip a few drops onto your butterfly feeder with your feeding dropper.
Or, provide your butterflies with slices of fresh fruit like watermelon or oranges. Score the fruit with a knife to bring the juices to the surface. This makes it easier for your butterflies to sip!
If you do not have sugar packets, combine 3 teaspoons of sugar with 1 cup of water. Stir until sugar is completely dissolved. Then drip a few drops of the nectar onto your butterfly feeder.
Refrigerate any leftover nectar. Give your butterflies fresh food every day. Do not leave containers of water or nectar in the habitat; your butterflies may fall into the container and drown.
7. Releasing your Butterflies
Now that you've watched them grow, it's time to Let Them Go! Our educators often plan their butterfly releases to coincide with a special celebration like Parent/Teacher Day, Graduation, Earth Day, or the last day of school. Please be sure daytime temperatures are above 55 degrees when you let your butterflies go and that it is a clear day with low winds.
Open the habitat carefully and watch your butterflies flutter away to pollinate and begin the life cycle all over again. Butterflies often land on little hands and faces before taking flight! Best of all, they may lay their caterpillar eggs close by... which means a whole new generation of caterpillars to butterflies right in your neighborhood!
Raise and Release Butterflies in the Classroom with Insect Lore
Your Insect Lore habitat is reusable. Wash your habitat with warm water and a drop of mild dishwashing liquid. Be sure to rinse thoroughly and then hang to dry. Once your habitat is dry, collapse it for easy storage! Then, once you're ready to start the exciting journey all over again, visit our website for more Cup of Caterpillars Refills!
Your butterflies may be fluttering free in the wild, but your classroom's STEM education is just getting started! Visit us at Insect Lore for our Butterfly Blogs for more tips, activities and incredible information about our fluttering friends. We're on a never-ending search for discovery and learning and we hope you'll join us on our further adventures!
Related products


Tips for Implementing STEM Education in the Elementary Classroom
In this article, we'll help explain practical strategies for bringing STEM into daily instruction and will explore specific butterfly-metamorphosis activities that enrich your students’ scientific understanding!


A Guide to Butterfly Migration
Butterfly migration is one of the most unique and captivating phenomena in the natural world, involving the seasonal movement of countless butterfly species across vast distances. Read on to learn about the fascinating fundamentals of butterfly migration and why examining these incredible journeys is so important for ecological research and conservation!


Enter Your Voucher Code Below
Our insects are sensitive to outdoor temperatures. We recommend ordering when
temperatures are between 50-90 degrees Fahrenheit.
If you are experiencing difficulty redeeming your voucher on your desktop, please use a mobile device for a better redeeming experience.
If you are experiencing difficulty redeeming your voucher on your desktop, please use a mobile device for a better redeeming experience.
We are unable to combine redemption fees. If you are redeeming 1-5 voucher codes, please complete separate purchases through our website for each voucher. If you are redeeming 6+ vouchers, please email us at customerservice@insectlore.com with your voucher codes and shipping address and we'll send you a custom invoice for payment.
$title
Thank you for Redeeming your voucher!
You redeemed a $title
Redemption Fee :$redemptionFee
$upsellList
$ctaLabel

Don't miss this special one Time Offer.
Check the Box to Add this Special Offer to your Cart
$upsellTitle
$upsellPrice
Don't miss this special one Time Offer.
Check the Box to Add this Special Offer to your Cart
$upsellTitle
SAVE $upsellSavePrice